A very happy new year to all. I've gone a bit quiet on my blog in 2012 but intend to pick things up a bit in 2013. I've made this new year card for the less is more challenge, where the theme is "drinks". It's a one layer card, using lots of masking with post-it notes. The martini glass is from VAP and the bubbles and numbers are from PaperArtsy.
Monday, December 31, 2012
Sunday, December 23, 2012
Last minute sewing gift : handbag tissue pouch
Thursday, November 22, 2012
I'm back in time for christmas
I can't believe how long it is since I have blogged, but it's time to start thinking about christmas cards, so I thought I'd share this reaaaaaallly basic one layer card that I made today. The stamps are from Crafty individuals (this is a great stamp sheet for christmas, there's so much on it)
I've used crushed olive distress ink, black arcvival and loose glitter (so now I'm all sparkly too)
I've used crushed olive distress ink, black arcvival and loose glitter (so now I'm all sparkly too)
Monday, July 23, 2012
"triangle square" card for rogue redhead designs
I saw the idea for this shape of card on the create and craft channel ( I think it was Debbie Moore) and thought I'd like to give it a try. I like the way the whole card is made out of just the front piece.
I actually made this with really thin card as a trial and was surprised by how well it stood up, so thought it would be useful as a quick notelet.
I wanted the square part to stand out from the border when standing, so I masked off the border and inked with tattered rose distress ink. I added the splashy background by using the background stamp from the beach babes plate. I used it unmounted and rolled it up so I could just "roll" the pattern onto the areas I wanted.
The flower is from the floriculture plate and the words are from the bits and pieces set all stamps are from rogue redhead designs
Wednesday, July 18, 2012
Less is More challenge- 3
The less is more challenge this week is to make a one layer card using "3" as the theme. I decided to use 3 stamps all from one stamp company to make this card. It's that time of year when you need a thank you card for your child's teacher, and it's that much harder when it's a male teacher. But I think this one does the job okay.
All of the stamps (the lines, the splatter and the words) are by PaperArtsy and I finished the card with a simple punched gold star.
All of the stamps (the lines, the splatter and the words) are by PaperArtsy and I finished the card with a simple punched gold star.
Monday, June 25, 2012
simple stamped card
I
haven't been stamping much recently, but I needed a simple thinking of
you card, and decided that the fern leaf from the rogue redhead
floriculture set was the perfect stamp. The words are from rogue
redhead's ultra-useful bits and pieces set. Between these two sets you
have a card suitable for almost any occasion. I find this fern leave particularly suited to masculine cards, something you might not expect from a floral set.
To create a subtle effect I used the second impression stamping of the fern leaf using peeled paint ink.
To create a subtle effect I used the second impression stamping of the fern leaf using peeled paint ink.
Saturday, May 05, 2012
ATC challenge at stampotique
It's not too late to enter the Artist Trading Card Challenge at Stampotique. I made mine using some of the new Alic in wonderland stamps
Monday, April 23, 2012
Kraft for Kids
 The theme at the Kraft Journal this week is Just For Kids. I decided to
post this gift bag which I made from a kraft coloured A4 envelope for a
new baby gift tag. The stamp is Lili of the Valley.
The theme at the Kraft Journal this week is Just For Kids. I decided to
post this gift bag which I made from a kraft coloured A4 envelope for a
new baby gift tag. The stamp is Lili of the Valley.The image is coloured with pencils.
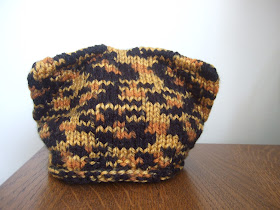
This was part of a set including the card from my last post. I've also included a picture of the bag when it was full. you can also see what was in the bag. a leopard print baby hat made with stylecraft safari chunky leopard

Saturday, April 21, 2012
Charming!
The theme at Less is More is to use a charm on your clean and simple card. This is a baby card I made with a Lili of the valley stamp, with a cute "made with love" charm.
It's hard to see from the picture but I have dotted glitter glue around the image for extra interest.
the image is coloured with pencils.
It's hard to see from the picture but I have dotted glitter glue around the image for extra interest.
the image is coloured with pencils.
Wednesday, April 18, 2012
Papertake weekly: a stitch in time

The theme at Papertake weekly is to using stitching on your card. This is a card that I made for my niece using scraps of pretty paper cut into heart shapes. I lightly glued them into place along the folds and then sewed with a machine.
 I got the idea for this card from one I saw on Pinterest
Saturday, April 14, 2012
doodling..

Oh what a joy! two of my favourite challenges have the same theme this week.
Less is more have a one-layer week, which perfectly suits this card that I made for the Stampotique challenge.

I used Pretty Party Dress from Stampotique and I doodled!!

I doodled the patterns on the dress, the partial frame and the words! that's a lot of doodling for me. (I guess playing the DrawSomething iphone app is starting to sneak into my cardmaking!!)

Sunday, April 08, 2012
less is more: three shades of green

The challenge at Less is more is to use one ink to make three shades of green.(edit: I misread the challenge, you don't HAVE to use the same ink, it's just a suggestion, but one that I liked!) It's not a one layer challenge, which gives a little more freedom to get messy.
The panel was made by rubbing forest moss distress ink (I'd meant to use peeled paint, but I'd got the lids mixed up) onto my glass mat and sprayed it with glitz spray, and dabbed the card onto it.

I then stamped the image with the same ink using PaperArsty HP1006, and inked the edges with the same ink using cut and dry foam. I did another light spay of glitz spray and dabbed some off with a cloth. To make the edges sparkly, I sprayed some more glitz spray onto my glass mat and dipped the edges of the card into it.

I then stamped the image with the same ink using PaperArsty HP1006, and inked the edges with the same ink using cut and dry foam. I did another light spay of glitz spray and dabbed some off with a cloth. To make the edges sparkly, I sprayed some more glitz spray onto my glass mat and dipped the edges of the card into it.
I then mounted this panel onto a plain card, for the clean and simple look.
Friday, April 06, 2012
spring has sprung at Stampotique

The theme at stampotique is spring has sprung. I made this simple card using stampotique stamps and a little spring flowersoft

Sunday, March 18, 2012
ballerina gift bag from an A4 envelope

Continuing with the music theme for the March Happy Daze challenge, I decided to use some Tim Holtz tissue tape and lost Coast's Ballerina 2 to make a simple gift bag from a A4 envelope.
To make the bag cut the envelope to 9 inches long. Use the cut off part to make the tag.
score the sides and base of envelope at 1.5 inches and fold. Score 3 inches from the top and fold this to the inside of the bag. Do not make up the bag until all the inking is done. Attach the tissue tape all the way around the bag leaving a little space.
Fold back the bottom 1.5 inch and ink with vintage photo distress ink below and just above the tape.
Stamp Abstract foliage along the bottom with vintage photo.
Fold into the bag shape, glue the base triangles to the base of the bag.
Punch holes in the top, attach the tag (which was simply stamped, inked and coloured with pencils)
Tie ribbon through holes.
Saturday, March 17, 2012
mothers' day card (not my usual style)
Wednesday, March 14, 2012
stampotique: wearable art challenge and a chance to be a guest designer.
Want a chance to be a guest designer for Stampotique? We love to give our fans a chance to be a part of Stampotique throughout the year, and our challenges here are one way to do that.
There are 2 ways to enter this challenge. First one is you can join in with our challenge here and when entering put GDT next to your entry. Second way is you can create anything with Stampotique stamps and post it over on our Facebook page. Please remember either way you must use Stampotique stamps.
We will announce our next guest designer with our next challenge on March 28th.
--------------------

For my wearable art, I used Monster by Roc Nicholas. I stamped with versacraft fabric ink, which I hot-ironed to set. I stamped again onto felt and cut out the body, which I glued in place with fabric glue and the blanket stitched in place. I then embroidered various parts and sewed on a button. I also used whatever stamp. I gave this t-shirt to my 9 year old to wear.

--------------------

For my wearable art, I used Monster by Roc Nicholas. I stamped with versacraft fabric ink, which I hot-ironed to set. I stamped again onto felt and cut out the body, which I glued in place with fabric glue and the blanket stitched in place. I then embroidered various parts and sewed on a button. I also used whatever stamp. I gave this t-shirt to my 9 year old to wear.

Sunday, March 04, 2012
music card for Happy Daze

To fit with the "march to your own tune" theme this month at the Happy Daze challenge, I have made this easy music themed card using Scrolls Work Stamps. Scrolls Work Stamps are not trading anymore, but Happy Daze still have a limited amount in stock.
for this card I used Sheet Music and Knapp music Chart.

To make the card I masked off a strip of the card and inked with various brown distress inks and overstamped with the sheet music stamp. I then stamped the knapp music chart with sepia versafine ink. I embossed two lines down the sides of the strip to make it stand out more,

to make the embellishment, I stamped the sheet music stamp onto white thin card. I ripped it into strips, and inked with distress inks, rolled it up and glued the rolls. I tied a ribbon around them added a charm (these are similar to what I used)and then glued to the card. I have left it sentiment free, but a sentiment could be added for any occasion for a music lover.
I am also entering this for the Less Is More "neutrals" challenge
Tuesday, February 28, 2012
stampotique: Pink, purple and black

The current challenge at The stampotique designer's blog is Pink, Purple and Black, so I made this clean and simple card using stamps from Stampotique

Monday, February 20, 2012
another (larger) knitted hot water bottle cover

When I was knitting my mini hot water bottle covers for Christmas, I accidentally picked up 3 hot water bottles from poundland that were the wrong size for the pattern I had written. They are still small but larger than the mini ones.
so here's the updated pattern if your hot water bottle is this size.


use the same techniques as the original pattern, but
cast on 60 stitches
increase on first 3 rounds as before (72 stitches)
st st 50 rows (53 rows in total)
decrease as set in original pattern for 4 rows
1 row st st(in same colour as neck if you are changing colours)
2x2 rib for 3 rows
for pocket
pick up 22 stitches on the 14th row.
st st 20 rows.
moss stitch 2 rows, cast off in moss stitch.
I made sure that the number of stitches for the body as a "nice" number, as it has so many factors (i.e. you can divide it by 2,3,4,6,8,12 etc) so is perfect for setting up lovely fairisle patterns such as this simple heart.

of course you could just cheat and use a self-striping yarn (this is actually the original sized pattern)
.......................................................................
new pattern
Materials
1x medium hot water bottle
1x 50g ball of DK yarn (about 100yd) if doing in just one colour, or you can easily use up oddments.
1x 4mm circular needle
scrap of fabric
dried lavender (I got mine from ebay)
gauge (important-ish) 21st and 23 rows over 10cm square stocking stitch.
instructions
cast on 60 stitches, and divide in half on your circular needle, using the magic loop method. each of these halves I will call a "section" and two sections make a "round".
increase one stitch at each end of both sections on next three rounds. Knitting every row (creates stocking stitch when knitting in the round) - I increase by knitting into the front and back of the first and last stitch. (46 stitches)
continue knitting for 50 rounds ( 53 rounds in total)
decrease 1 stitch at end of each section for next four rounds ie :( K1 KSPO K to last 3 sts of section K2tog K2 KSPO K to last 3 stitches K2tog k1) twice
k 1 round
k2 p2 rib 34 rounds, cast off in rib.
to make the pocket
pick up 22 stitches in the middle of one side of 14th row,
stst 20 rows (ie k1 row p 1 row - you are not knitting in the round anymore, just using your circular needles as normal needles)
moss stitch 2 rows
cast off in moss stitch
moss stitch 2 rows
cast off in moss stitch
sew up bottom of cover
sew up sides of pockets
make lavender bag to go in pocket


