I made a matchbook notebook like this for my second piece in this months stamping contrasts article in craft stamper magazine, but as it was my second piece I didn't really get much space to explain how I did it, so I thought I would include full instructions here if anyone is interested.


materials: card, paper, trimmer, scorer, stapler, adhesive

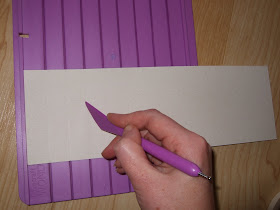
trim a strip from the card (size isn't really important, it depends how big you want your notebook to be)

score 3 small strips of equal size.

fold up as shown

bend down the cover so that it overlaps the fold a little, not all the way as you need to allow room for stapling.

and fold

cut paper smaller than the cover for pages

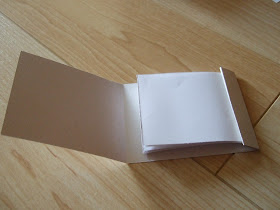
open out and lay pages so they lie against the first score line, on the right side of the card (i.e. the side that will show on the outside of the book)

staple in place

the staples should be close to the bottom of the page (gives more room for the cover.) do not worry about stapling neatly, you will not see the staples

turn over and apply adhesive to back of first scored bit

fold up so the adhesive sticks this bit down.

you can now close the notebook and decorate at will

(all stamps on TGIF piece by non-sequitur)
This is lovely Joanne, thanks for the instructions and great to see you as guest designer too.
ReplyDeleteWow Joanne this is fantastic book and lovely tutorial. I love Alice.
ReplyDeleteThanks for this wonderful entry as Guest-Designer on TGiF.
This is gorgeous, and it's not very clear in CS what this is, so it's good to see one open etc...fantastic idea. love it.
ReplyDeleteAbsolutelty gorgeous and thank you for this great tutorial.
ReplyDeleteThis is gorgeous, Joanne. I think I'll have to make one now that I have the full instructions. :-)
ReplyDeletewhat a fabby little book.
ReplyDeleteThanks for a tutorial. Great job. I did several books but its always good to learn a new way of putting it together.
ReplyDeleteGordana
Lovely book, Joanne! Great theme!
ReplyDeletegorgeous ! thanks for the great instructions!
ReplyDeleteLove your Match book. Really cute.
ReplyDeleteWonderful book Joanne.Great theme.Will be trying this one..
ReplyDeleteBeautiful book! Thanx for your tutorial!
ReplyDeleteWhat an absolutely gorgeous and inspiring project Joanne. Thank you for the turtorial!
ReplyDeleteand if I get stuck all I have to do is look to my left as I am lucky enough to own this, so have no excuse not to join in - thankyou Joanne its even more fantastic in RL. I love the small heart, eggs and zoomz detail in the corner, and to use Alice pages is a perfect touch. xx
ReplyDeletebeautiful!! thanks for the tutorial!!
ReplyDeleteLovely card and inspirational tutorial. Thanks a lot!
ReplyDeletebeautiful book and thank you so much for the clear instructions
ReplyDeletex Hilda
This is truelly amazing .
ReplyDeleteThanks for this great tutorial.
lovely book joanna.
ReplyDeletethank you for a great tutorial
Joanne, thanks for the tutorial. Love your new background.
ReplyDeleteBecky
Wow, this is quite an inspiration piece. I love what you've done in putting all the together. Fabulous project!
ReplyDeletecongrats Joanne, a lovely project. I love the idea of the print strip along the bottom with the name on top.
ReplyDeleteJoanne, I've nominated you for an award. It's on my blog today.
ReplyDeletegORGEOUS WORK!!!
ReplyDeleteCongrats on the guest host slot Joanne, love your book and what a great tutorial.
ReplyDeleteI was so excited when I saw that you were the guest this week! Your piece is so imaginative. What a pleasure to learn how you made this fantastic match book.
ReplyDeleteI love little matchbooks like that! Very cute! I hope your parcel arrives soon. :o)
ReplyDeleteThe Tutorial is fab and the matchbook is gorgeous X
ReplyDeletea lovely book
ReplyDeleteHi Joanne, this is fabulous, thanks for the tutorial, it really is gorgeous. joey xxx
ReplyDeleteGreat matchbook, love the theme. Thank you for such a great tutorial too.
ReplyDeleteLovely Joanne - thanks for sharing :-)
ReplyDeleteThank you for a neat tutorial :) Juliet
ReplyDeletelovely joanne,great tutorial-just fabxx
ReplyDeleteNow how did I get my head in a spin so badly that I missed this! Awesome project and great instructions! I don’t know if I can decorate it as well as yours but I am going to give it a go :))
ReplyDeleteBeautifully created, Joanne! Great tutorial!
ReplyDeleteJust had to come and see your tutorial as blue eyed Linda had a link. Wonderful and inspiring, thank you for sharing Joanne!
ReplyDelete