Wednesday, June 30, 2010
triangle gift box
Today on the Frantic Stamper blog . I have a quick tutorial for making this easy gift box.
and yes, there's flower soft!
all stamp credits and instructions are on the frantic stamper blog and materials are available from the frantic stamper shop
As I have a strip of torn paper across the bottom of the box, I am entering this for Theme Thursday's torn paper theme.
The frantic stamper is offering a prize to one of it's readers. Here's what you need to know
The Frantic Stamper Happenings Blog has something new for you!
Our design team works really hard to bring you all these wonderful projects, so lets show them some appreciation. Leave a message on the blog for the June project you liked best and you might be selected to win a prize from the FranticStamper store.
Fran will be making the selection of the lucky winner from those who leave messages for the designers. She will be making her random pick in about a week, so get those comments in!
In the meantime, we hope you will continue to enjoy the projects for July, and will let the designers know how much you like those, too!
Tuesday, June 29, 2010
Spongebob Spongebag!
I found these Spongebob Facecloths in Poundland, and knew that I had to get them, my youngest son just loves Spongebob Squarepants. I also knew that I wouldn't be using them as facecloths... I decided to buy two and make them into a wash bag. The great thing about using facecloths is that the edges are already hemmed, so the washbag can be made up in minutes.
it's such an easy thing to do so I thought I'd offer up a quick tutorial,
so here it is ..
my " making a drawstring wash bag from two facecloths" tutorial
1. buy two facecloths
2 sew a channel in the top of each cloth
3 place them right sides together, and sew together up to the point where you have sewn the channel
4 Turn right side out
5 thread some cord attached to a safety pin, through one channel, then in the opposite direction through the other channel, and tie the ends together
6 do the same with another cord, starting from the opposite corner.
7 pull the cords to close (and watch spongebob's face change, lol)
Monday, June 28, 2010
forever friends: stitching
This week at the Forever Friends Challenge We have a challenge for you to use stitching on your forever friends artwork. You can use real, faux, drawn, stamped, rub-ons....
On my card I have used rub-on white cross stitches.
This week's challenge is being sponsored by Crafts u Love and there are some lovely clear stamps to be won.
Sunday, June 27, 2010
August Craft Stamper Sneak Peeks
The August Craft Stamper arrived yesterday. It isn't due out until next week but I know it is also available in some shops.
I have my first ever "proper" article in this issue, with a step by step to using Flower soft.
I'd love to know what people think of the article, but please be kind, remember it's my first time!!
I'm very excited about it and keep going back and looking at it with immense pride. I love how the article has been laid out, it just looks so co-ordinated. oh, and in the step-by step pictures, that IS my hand! my hand is famous, lol
I used stamps from PaperArtsy. And I am able to show you a couple of sneaky peeks.
Saturday, June 26, 2010
brownie box
There's a bit of a story behind this piece. It was my friends birthday and I thought it would be nice to get her a cupcake with a candle in it. So off I set for the local bakery. But apparently English village bakeries don't sell things as glamorous as cupcakes. The closest I could get was a chocolate brownie... not quite the same thing, as I walked home (in a bit of a sulk) I decided that I could make it look more interesting, so I decided to make a presentation box for it. All the materials were from the frantic stamper, and the instructions for it are here on the frantic stamper blog. There's loads of other tutorials on the frantic stamper blog, it's well worth a look.
bee mobile!
and I don't mean a little car for bees!!
Today on the Gingersnap blog, I have a tutorial to make this bee mobile that fits down into an envelope. The stamps are from Jo Capper-Sandon's range at Stampotique, available from Happy Daze in the UK.
I am entering this for Stampotique's "freedom" theme as the bees are freed when they are lifted from the envelope.
Friday, June 25, 2010
teddy bears' picnic
Over on Gingersnap creations The July reasons to stamp have just been posted. I chose to make a card for July 10th- teddy bears' picnic day.
The girl is a sugar nellie stamp that was a subscription gift from Craft Stamper, The flowers are from Jo Capper-Sandon's range at Stampotique, available at Happy Daze in the UK, and the cupcake is hand drawn by me!
I have paper pieced her dress, and coloured the rest with pencils. I added a flower to her hair from the same stamp as the background flowers, the bear is stamped again and put on 3d foam.
Don't you think it looks like she's eyeing up the last cupcake while posing for a photo?
Thursday, June 24, 2010
Collage, my way!
The theme at Theme Thursday is collage. If you have visited my blog before you may have noticed that I have a bit of a thing for white space. So when I collage, I don't feel the need to cover every space of my card.
The quote stamp is from Scrolls Work Stamps and the collage image is one of Inka's old collage images. Inka is now selling some of her images to download at her etsy shop.
This style of small collage allows you to use up some of those smaller images that just wouldn't work on a larger collage
Wednesday, June 23, 2010
GC20 shades of blue
The theme at Gingersnap this week is shades of blue.
I made this birthday card for a 12 year old boy, who'd have thought you could get away with using balloons on a 12 year old boy's card? but I think it works with this little fella.
The boy is from stampotique (available from Happy Daze in the uk) and the balloon is actually taken from a forever friends stamp. I have coloured with whispers markers and hand drew the string and bow.
Tuesday, June 22, 2010
sympathy card
We never want to make them, but know that they are appreciated. This is a card I made for a friend who has lost a relative. The card uses stamps from PaperArtsy.
Coincidentally the theme are Crazy Amigos is black, white and green, so I am adding this to that challenge
Saturday, June 19, 2010
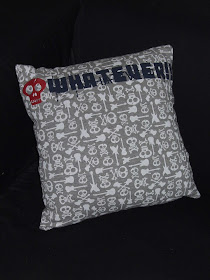
t-shirt cushion tutorial
I got a lovely response to the last t-shirt cushion that I made I decided that while I was making another one today I would put together a tutorial.
Start with a favourite t-shirt that your child has grown out of and make sure it's ironed.
you will also need: a cushion pad (I got mine from poundland!); needle and thread; pins; a ruler
turn inside out and mark the largest square you can between the arm seams and neck. Pin the two sides together, leaving most of the bottom edge unpinned.
sew, either by machine or hand, the two sides together, leaving a large opening, but going past the corners on the opening edge.
I like to hand sew, as I find it relaxing and can do it anywhere.
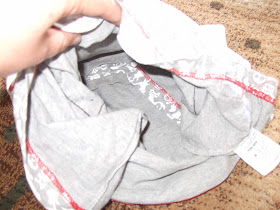
turn inside out, leaving the rest of the t-shirt intact, use your hands to flatten down the sleeves and neck edge inside.
fold the bottom edges inside
insert the cushion pad, ensuring the sleeves etc still lie flat
neatly close the edge with pins
sew together, trying to keep the stitches hidden
you could of course add a zip, but I love the simplicity of doing it this way, and my son loves his cushions, and wants to grow out of more of his t-shirts so that he can have a huge stack of them on his bed.
Friday, June 18, 2010
thank you cards
The theme at Created by hand is "gratitude". I made these thank you cards a little while ago but never blogged them. They were for my 12 year old son's birthday presents. I love this stamp from stampotique as it works for that difficult 11-16 age for boys.
The sentiment was printed of from the computer.
Stampotique stamps are available from Happy Daze in the UK.
Thursday, June 17, 2010
super simple belated card
oh don't you just hate that feeling when you realise you've forgotten a birthday, however I do it so often I have a stamp for just such an occasion, it's from a SeeDs set and I've used it inside this card.
The front of the card, however, gave me a chance to play with all new stuff, the stamps are from the new paperartsy Hotpick 6. I have also use a die cutting die from Paperartsy for the moth. I am not a big diecutter. I love the effects but I'm just too tight to buy a decent diecutter. All I have is the x-cut impress and I wasn't sure it would work with these dies, without faffing about with shimming etc, but to my great delight they work beautifully, in fact even better than the x-cut dies!!!
This card couldn't be any easier to make but. I do love simple!
I am entering this for lots to do's wings challenge
Wednesday, June 16, 2010
tiny fairy door
The theme this week at Gingersnap Creations is Fairies, for my DT piece, I decided to make a tiny fairy door.
The door and surrounding brickwork are one stamp from scrolls work stamps and the wish word is also from Scrolls work. I coloured it with various media until I got the effect I wanted, and then I finished it with some flower soft.
You can see it in position on my skirting board.
Monday, June 14, 2010
c'mon England!
I actually have very little interest in football, but I get that the world cup is important, so this is my one and only piece of world cup themed crafting.
The stamps are from Lofty's world tour from Joanna Sheen,
who are sponsoring this week's forever friends challenge where we want you to show us your favourite cute stamps that are not forever friends, so this is a rare opportunity for everyone to take part in our challenge, and there is a £10 voucher for Joanna Sheen up for grabs for one lucky random winner, and considering Joanna sheen have free p&p on everything to anywhere in the world, that will go a long way...
so what are you waiting for?
I am also entering thid for Crazy Amigos' world cup soccer theme
Saturday, June 12, 2010
Happy Daze Design Team announcement + tag
I am really pleased to announce that I have been invited to join the Happy Daze Design team. Happy Daze are a fantastic UK shop, selling loads of gorgeous stamps, tools and accesories.
One of the fabulous ranges they sell is Stampotique originals, I have used two of their stamps to make this really quick and simple tag. The glitter has been done with a glitter spray, masking off the unstamped areas of the tag, and the body of the fairy. I think it makes the text look almost like an glittery acetate layer
Thursday, June 10, 2010
Mad Hatter blog hop stop .. gingersnap creations
Welcome to the Gingersnap Creations’ Mad Hatter’s Day Hop and Hop Stop #5
The Gingers are celebrating Mad Hatter Day and hope that you will hop along with us!
If you’ve already been hopping then hopefully you have just come from Jean at Bluebird Paperie. If you are starting here, welcome! It's a loop so you can start anywhere along the way!
At each stop, you need to collect a word! There are 10 stops in all starting and ending with the Gingersnap Creations blog where you can get all the specific information and get a peak at the the goodies in the Mad Hatter Giveaway.
When you get all your words, 8 in all, unscramble them to form a quotation from the beloved classic, Alice in Wonderland. Once you have your guess at the quote, email it and your name to gingersnapstamp@gmail.com by June 25, 2010. We will be picking one lucky winner at random from the correct entries to win the Mad Hatter package! We’ll let you know who won on June 29, 2010.
If you visit all the stops, you should end up right back at Gingersnap Creations with 8 words! Unscramble the words to come up with the correct quote and email it on to gingersnapstamp@gmail.com. That's all there is to it!
If you get lost along the way, you can see the entire route at Gingersnap Creations.
My word is "writing".
Your next stop on the hop is Linda at Studio L3. Have fun and good luck!
I decided to decorate a notebook for my stop. All the stamps are by Scrolls Work.
I love this scene of Alice escaping as it 's right at the end of the story just before she wakes up and has the feel of utter chaos as things return to reality.
I am also entering this for Crazy Amigos' Alice theme