Monday, November 29, 2010
forever friends.....
A nice easy challenge for you this time at the forever friends challenge, a card in 45 mins. Now this means different things to some people. for some people, this is a quick card, for me this is ages. in fact I know this card took me far less than 45 minutes, but it's the Christmas card for my book group (hence the book page hats), and my challenge to myself is can I make all 9 that I need in 45 minutes??
I think I can.
the stamp came free with the docrafts magazine ages ago. The base card is Papermania Kraft card and I've coloured with coloursoft pencils.
Sunday, November 28, 2010
time's running out, it's time to start the batch making
it doesn't matter how early I start my Christmas card making. I never really seriosuly start to make the quantity I need until the threat of December looms.
Panic started to set in and these cards were the result. I made 30 in about 45 minutes!!!! now that's batch making!
The stamps are by Crafty Individuals, and I lined the two stamps up on the same block to save even more time. I suppose if I include the time it took for the glitter glue to dry it took a bit longer.
I'm entering this for another challenge that I've just come across, fussy and fancy, where the challenge is christmas without red and green.
Friday, November 26, 2010
Craft Stamper January Sneak Peek
I received my subs copy of the January issue of Craft Stamper magazine today. (the cover mount stamp was missing but I rang Traplet and a very nice man said he would send me one).
January's issue is a special "budget" issue, with lots of ideas for money saving projects. My Article is a two page piece using ultra cheap colouring pencils. I got a pack of 50 from Asda for £1. I've made three simple cards for the article with lots of tips for getting the best out of colouring with cheap pencils.
The sneaky picture above shows just one of the cards. for this one I used Jasmin by Jo Capper-Sandon from Stampotique, available at Happy Daze.
I also used a forever friends image and a papermania image.
I hope that people enjoy it. Let me know what you thought (it's on page 46)
Thursday, November 25, 2010
Cath Kidston inspired new home card
I made this card for my sister who is moving house. Having visited the Cath Kidston store this week I have been very inspired by their patterns (as you can also see on my nail art blog) This was a really easy card made with stamps from Crafty Individuals.
Sunday, November 21, 2010
Christmas card with a non-Christmas stamp.
I wanted to make this card as I have just bought some Vintage Christmas flower soft. I thought it would make a perfect wreath, but then I spotted a card I have recently made with this heart stamp (a Paperartsy mini), so I wondered if it would work. I stamped the heart in forest moss distress ink and then just added the flower soft with little dots of good PVA glue, and finished with a ribbon.
So quick and easy!
I am entering this into Keep it Simple's Evergreen challenge.
Saturday, November 20, 2010
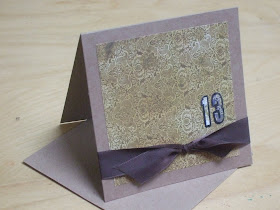
birthday card and present for 13 year old boy!
Did I feel a shudder then at the thought of not only trying to come up with a present but also making a card for a 13 year old boy?
I thought so.
Well luckily I didn't have long to think about it so I just had to go with simple. I'm fairly pleased with the outcome, it's no masterpiece, but it passed the husband test. The card blank is from a pack of Papermania Kraft cards, I am so pleased I found these, they are just gorgeous. The knot is again the immovable knot from Simplicity. if you haven't tried this technique yet, then go do it now.
seriously what are you waiting for? It's amazing.
it's okay, I'll wait while you go...
dum de dum.
meanwhile, I also needed a present.
of course it has to be an Amazon Voucher. SO I made another of my scroll boxes. But this time I kept it really simple. The folded tag is made from some of the offcut from making the box and is perfect for holding the tie closure in place.
The immovable knot is one of my favourite techniques at the moment so I am entering this for the lots to do challenge
Friday, November 19, 2010
forever friends: Chocolate or Cake
The Current Challenge at Forever Friends is Chocolate or Cake.
The design team were sent a gorgeously cute CD-ROM from Joanna Sheen, called Precious Petals, which includes toppers, gorgeous images, backing papers, sentiments and fabulous cake boxes.
I decided to make a chocolate bar wrapper, which I thought would be a nice little gift for the mum of a new baby girl. The backing paper and the gorgeous image are from the CD-ROM.
Wednesday, November 17, 2010
it's a snowman stitch-up!
I made this for the winter themed 4x4 swap taking place on gingersnap creations, and tied it in with my DT piece for the stitching theme on gingersnap too. It also fits with this week's created by hand challenge: snowmen.
The stamp is Chilly by Jo CapperSandon from Stampotique, available from Happy Daze. I have embossed tracing paper (not vellum, cheap tracing paper) with a snowflake design, and stitched it to the main piece, before sewing up the final edge I popped in some loose white flower soft in to create a shaker effect.
unfortunately it really doesn't photograph well. these are much nicer in real life.
Tuesday, November 16, 2010
chocolate advent calendar
I love advent calendars. When I was a child one of my favourite things was looking for the date. I like it when it's a little bit of a challenge. I also loved chocolate advent calendars. This is my take on the chocolate advent calendar.
My favourite thing about this is that you have to root around in the basket looking for the right number.
I took 24 small bars of chocolate (these are kinder and I got them from the pound shop) and made wraps from PaperArtsy's Rum and Raisin papers, stamped with various stamps from my rather extensive selection of PaperArtsy Christmas stamps. This is a great excuse to get all your Christmas stamps out and just play before the serious business of the bulk Christmas card making.
I am entering this for The Stampman's anything goes christmas challenge
Monday, November 15, 2010
box for a scroll or rolled voucher, tutorial including custom made scoring board.
Today on the Rogue Redhead blog, I have this tutorial
One of my favourite presents to give at the moment is Amazon vouchers. I love that you can print them straight off, and let's face it, you can buy pretty much anything from Amazon.
But they are not very exciting to give, so that's why I came up with the idea of making a box to put a scroll in, so you can roll the printed voucher up and give as a proper gift.
I have made mine from a sheet of A4 card, it would be easy to adapt this to a similar sized card. I decided that I needed all my scores to be a width of 4cm, however my scoring board doesn't do this width, so I decided I needed to custom make my own scoring board. This was really easy to do, fold a card as shown, so that the channel is just the right width for your embossing tool. mark the width on that you want. As I wanted to be able to score lengthways A4 card, and repeat the scoring, I added little extension pieces to the measurement.
you can see the board in use here. it really does work.
score 4 lines at 4cm intervals lengthways down your card, and 4cm in from each edge.
trim the last flap down to 3cm and shape as shown. cutting away all the shaded areas, and between the side flaps.
fold up and glue side flaps together and place your rolled paper/voucher/certificate/invitation etc, inside.
decorate however you like. I have used a quote and the background from the Relish Reading plate from Rogue Redhead Designs.
One of my favourite presents to give at the moment is Amazon vouchers. I love that you can print them straight off, and let's face it, you can buy pretty much anything from Amazon.
But they are not very exciting to give, so that's why I came up with the idea of making a box to put a scroll in, so you can roll the printed voucher up and give as a proper gift.
I have made mine from a sheet of A4 card, it would be easy to adapt this to a similar sized card. I decided that I needed all my scores to be a width of 4cm, however my scoring board doesn't do this width, so I decided I needed to custom make my own scoring board. This was really easy to do, fold a card as shown, so that the channel is just the right width for your embossing tool. mark the width on that you want. As I wanted to be able to score lengthways A4 card, and repeat the scoring, I added little extension pieces to the measurement.
you can see the board in use here. it really does work.
score 4 lines at 4cm intervals lengthways down your card, and 4cm in from each edge.
trim the last flap down to 3cm and shape as shown. cutting away all the shaded areas, and between the side flaps.
fold up and glue side flaps together and place your rolled paper/voucher/certificate/invitation etc, inside.
decorate however you like. I have used a quote and the background from the Relish Reading plate from Rogue Redhead Designs.
Friday, November 12, 2010
girly girl sweet sixteen
The theme at Stampotique this week is "Girly Girl" I thought that this was the perfect opportunity to make a card for my niece's Sweet Sixteen which is coming up soon.
I felt that "girl with heart purse" was suitably girly, but just to be sure I added plenty of pink, flowers, ribbon and gems.
The ribbon is tied using the immovable knot technique from Simplicity. Try it, it's genius!!
The back is embossed using a mask from Clevercut, in my new (ish) bigshot machine. The image is coloured with whispers markers.
The stamp is available from Happy Daze.
Monday, November 08, 2010
monday rogue
Monday is my day at the Rogue Redhead blog (not every monday I hasten to add, but my posts will always be monday)
Today I have posted this really simple card with stamps from the relish reading plate, one of the things I love about this plate is the quotes. You can't actually read them on here, but they make an interesting background. If you are interested in the details of how this card was made the infor is on the rogue redhead blog
Sunday, November 07, 2010
crochet heart
I had a little wool left over from the baby girl cardigan, so I decided to make a crochet heart to add to the outside of the present. The pattern is from Fave crafts I changed the bow and added the button though.
Saturday, November 06, 2010
Rogue Redhead designs, a brand new stamp company
Announcing Rogue Redhead Designs, a brand-new stamp company!
RRD offers deeply etched unmounted stamps on high quality rubber.
You’ll love the level of detail!
Started by avid stamper, Sharon Briss, this new company
will feature stamps in several different styles
including vintage, eclectic and modern.
Our first full plate release is a tribute to the
literature lovers in our midst.
The “Relish Reading” unmounted plate is
perfect for creating hand-made bookmarks,
adding a personal touch to journals and
creating beautiful note cards.
This 8" x 10" plate includes images and elements to
get you stamping right away
from a full-sized background to focal images to sentiments.
“Relish Reading” is available at the Rogue Redhead Etsy store.
As part of our initial release, RRD is offering this brand-new plate on sale for
20% off the regular retail price of $22.00 until December 15, 2010.
Get yours now for the introductory price of $17.60!
Want to see some samples with the Relish Reading plate?
Check out our new Rogue Redhead blog to see what the
Rogue Crew has been creating.
We’ll be having new art regularly from our scandalously talented team!
Watch out too for our Rogues at Large as they drop in on us to tempt us with
some of their own amazing art!
--------------------
My sample is a bookmark card, the bookmark is attached to the front of the card by photocorners.
Each of the DT have been assigned a day on the blog. My day is monday (but not necessarily every monday). So if you are interested in seeing what else I have made with this wonderful sheet of stamps, check back regularly. It's been great fun working with this sheet as it has everything you need to get going, backgrounds, quotes, words, swirl, embellishments, borders and some wonderful main images, all around the same theme and working perfectly together, and if you are into using old book pages in your artwork what could be better than book themed stamps.
I love to read and I run a fabulous reading group, so this set of stamps couldn't be more perfect for me!
Friday, November 05, 2010
baby girl cardigan
Wednesday, November 03, 2010
gingersnap challenge: Haute Couture
This week the challenge at gingersnap creations has the theme Haute Couture. A nice open theme that can be interpreted in many ways. It's lovely to see how the design team have interpreted it in diferent ways.
I chose to use this magenta stamp, coloured with whispers markers (and the dress is paper pieced), which just reminds me of fashion sketches and the wacky outfits of modern Haute Couture. The layout of the card came about completely by accident. You know the usual.. it started as a one layer card, but then I got a smudge....
Monday, November 01, 2010
Forever Friends: Tags or Punches
This week at the forever friends challenge we challenge you to use tags or punches (or both) in your forever friends creation.
I used both on mine. The heart and crosses is a x-cut border punch and the heart is some random punch. The tag is a sissix die.
The bear is simply coloured with coloursoft pencils (no blending). I have made this for a friend that has recently had a baby girl. I've also knitted her a cardigan, which I am just finishing off the ends on. I will blog that soon too.