Tuesday, October 03, 2023

Chutney Tuesday - Cherry Tomato Chutney


It's been so long since I posted a chutney recipe but with the last batch of cherry tomatoes from our garden threatening to go to waste, what other options did I have?


First I picked over the tomatoes to make sure no bad ones slipped through.


Ingredients:
3tbls oil
1.5kg cherry tomatoes ( halved)
2 bramley apples finely diced
500g red onion sliced
4 cloves garlic crushed 
500mls red wine vinegar
3 tbls Worcestershire sauce
4tbls balsamic vinegar
150g dark soft brown sugar
350g granulated sugar
200g sultanas 2tsp mixed spice
1tsp celery salt
2 Bay leaves.

Instructions
Heat the oil and fry onion and garlic until softened. Add tomatoes and cook for a few minutes add all of the other ingredients and bring to the boil. Reduce heat and simmer, stirring regularly. Once reduced to a jam like consistency store in sterilised jars.


Sunday, December 15, 2019

Clean and simple pencil crayon Christmas card.

It's been a while since I posted.
I have mostly given up papercrafting and stamping and am now focusing on yarn crafts.
This is purely down to lack of time.
Occasionally though I just can't resist and have to whip up a card.
This is the simplest card made from kraft card and pencil crayons.
The white edging on the central piece is just done by running a white pencil around the edge.

Friday, March 23, 2018

Crochet Pom Pom : updated technique

I posted this previous tutorial on crocheted pom poms some time ago. Since then I have actually completely changed how I do them, so I thought I would post a new tutorial.

I have done this tutorial with contrasting colours to show the two different parts more easily. There is no need to do this if you prefer not to, but if you do, the contrast colour will not show in the finished project.

The basis of this technique is that you are crocheting around a loop  that you will pull tight.

First make your loop with your contrast yarn, by laying your yarn out thus:

The area you will be using to do your crochet is the double part.


 Now, using your main yarn, make a slip knot .


Make a double crochet (US single crochet) into the loop as shown.


 Now do 15 chain


 Slip stitch (US single crochet) into the loop.


Repeat this along the loop


Here is a short video showing one complete chain loop.


Continue until you feel that your pom pom is full enough. Complete the chain loop you are working on and do one extra chain after the slip stitch.


Break yarn and pull through.


Arrange the loop so you can see all the ends clearly


Now pull on the loose ends of the loop to tighten up the circle.


Once tight, knot the two ends.


I also tie of the two ends of the main yarn.


You can now use these ends to attach the pom pom to your project.


I love this pom pom as it looks really good, but is also really robust: it will survive both young children and the washing machine!

Wednesday, December 14, 2016

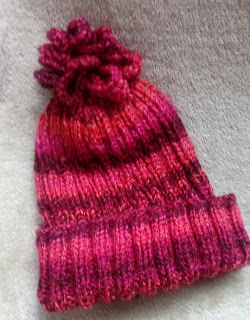
Ribbed hat: free pattern using James C Brett Pulse yarn.


I bought this lovely thick and thin type yarn on a whim while visiting the lovely B&M fabrics in Leeds (a stone's throw from the new John Lewis store and well worth a visit), I fully intended to make a hat, but wasn't sure exactly what I was going to do with it.
(James C Brett Pulse Chunky)

I tried crocheting it and just didn't love it, so set off making a straightforward ribbed hat. I am writing up the pattern here as it wasn't a yarn I had worked with before and I would have found a pattern useful, and I'm really pleased with how the decreases worked out.


In this pattern I am assuming knowledge of knitting in the round by whatever method you choose (I use the magic loop method)

The ball band states 6mm needles but I chose to use 5mm for a denser fabric and I love how it turned out.

I have designed it as an average woman's size but it is VERY stretchy so would fit a man and I think without the bobble, looks very masculine.

MATERIALS
1 x 100g ball James C Brett Pulse Chunky
5mm Circular needles
a pom-pom (optional)

PATTERN
Cast on 88 stitches (or any multiple of 8 for the decrease method to work) using your preferred method (I use thumb method)

2x2 rib (K2 P2) for 57 rounds

start decrease pattern

1) *K2  P2 S1 K1 PSSO P2* repeat from * to * to end of round
2) *K2 P2 K1 P2*  repeat from * to * to end of round
3)  *K2 P2TOG K1 P2TOGTBL* repeat from * to * to end of round
4)  *K2 P1 K1 P1*  repeat from * to * to end of round
5)  *K2 S1 P2TOG PSSO* repeat from * to * to end of round
6)  *K2TOG P1*  repeat from * to * to end of round
7)  *S1 K2TOG PSSO* repeat from * to * to end of round

you should be left with 11 stitches on your needle (or an eighth of the number you started with), pull yarn through these stitches and fasten off.

 There is actually this much yarn left - enough to make a pom pom ( I recommend this method) but I had a furry pom pom that I wanted to use.

This is another one I made but with James C Brett marble chunky and a crochet pom pom. This used exactly half of a 200g ball.

Wednesday, November 11, 2015

How to make a furry pom pom using easy crochet

Do you love the look of those furry pom poms that are on hats in all of the shops at the moment. I do. I wanted to add one to my hat but they are quite expensive to buy, so I just had to work out how to make them.

The technique only uses the chain stitch, so is suitable for non-crocheters, or those who want an easy introduction to crochet.
So this is how it looks.
(the hat pattern is Declan's hat)

First of all I found a ball of furry yarn that matched my hat. I got this ball of king cole moments. (I actually got it  for £1.95 from Leeds market.) From this one 50g ball I made 5 pom poms of the size shown.... bargain!


So, Instructions:
You will just need: furry yarn, 4mm crochet hook, and a length of any yarn (the carrying yarn). I chose to coordinate my yarn to the hat but as you will see later even if you use a contrast yarn, it will not show. The length of this piece of yarn is not important but 1 metre is a easy length to work with.


create a slip knot with the furry yarn, pull the carrying yarn through and then insert the hook into the slip knot.

Chain 15 with furry yarn


Use the hook to pull the carrying yarn through the last stitch....


...all the way through. then reinsert the hook into the last furry stitch.

continue in this way

bunching the furry loops up on the yarn, until you have made 50 loops. cut and fasten off the furry yarn.


bunch up all of the furry loops on the carrying yarn


Then tie the two ends of the carrying yarn tightly together to form the pom pom. securing with a double knot.


finished! now attach to your hat.


This is the pom pom in a different furry yarn.


The small one (which is for the innocent smoothie big knit) is made exactly the same way but the carrying yarn is pulled through every 5 stitches and only 20 loops are needed. I used a contrast yarn here to show it more clearly.


Which disappears when you tie it.


So, what about normal yarn, can you use this technique with that. why, yes you can.

In fact this is how I now do all of my bobbles as they can't be pulled apart like normal pom poms, making them especially safe for babies. And I think they look pretty cool too!
I hope this makes sense. leave any questions in the comments.

Sunday, September 06, 2015

The Mountain hat : a free knitting pattern

I wanted to make a present for a male friend's birthday, who likes to go trekking.
I decided to design my own hat, and also wanted to have a go at designing in excel:

So this was the final result.

Materials:
stylecraft special aran in Denim, Graphite and White, which I purchased from LoveKnitting.com 
(I thoroughly recommend this website, the service is amazing!) I bought one ball of each colour and had loads left over.
4.5 mm circular needles.

Pattern
I haven't included any instructions for shaping, but it's just decrease as necessary on each side of the panel.
An adult hat requires 4 panels, so start with casting on 96 stitches, knit in the round following pattern. the p represents purl stitches.
If it doesn't make sense, this is the basic pattern that the hat is based on, which should explain everything.


Saturday, August 08, 2015

crochet teddy lovey

I can't believe it's so long since I blogged. I made this "lovey" yesterday. I've been seeing them around on the internet for a while but this is the first one that I have made. They are a cross between a security blanket and a cuddly toy. The yarn was left over from a knitted double side blanket and I thought was  a good teddy colour.


I didn't have a pattern, I just made it up as I went along.

The edging creates a lovely feeling texture, for baby. The ribbon is also a touchy feely feature, and is sewn securely into place, with no fraying ends. All the features are embroidered for safety.


Tuesday, April 21, 2015

Crochet Tulip-edged Baby Blanket


I've seen this Tulip pattern all over Pinterest in one form or another and wanted to see if it would work as an edging.


I think it does!


The main part of the blanket is made with 2x100g balls of Stylecraft life DK in Cream. I used a linen stitch and 4mm hook.
The edging is done in the same brand (in rose and fern - I think) and then finished with two rounds of double crochet (british) and a round of rope stitch, using a third ball of cream. There is plenty of yarn leftover in all colours.