Monday, October 31, 2011

Rogue Redhead new release


Another Preview of the new stamps from Rogue Redhead, This is from the Candy Kisses Plate. A super simple card coloured with one colour of marker and a blender pen. I've also added some white flower soft for a snowy effect.

This colouring method is the same method as I used in the new Craft Stamper magazine, due out next friday.

Sunday, October 30, 2011

Happy Hallowe'en


I'm ridiculously proud of the pumpkins that I carved today!

Thursday, October 27, 2011

GC#124 Black and Grey


This week, the new challenge at Gingersnap creations is Black and Grey. I used this fabulously spooky image from Crafty Individuals, which was just perfect for the theme.

I stamped the image in grey and then again in black. from the black one I just cut out the bed. One the grey one I created a mask for the moon and building and then made the whole background more moody with black and grey distress inks. I mounted the bird on 3D foam.

I finished with an immovable knot.

Wednesday, October 26, 2011

What's your poison?


The new challenge at Stampotique is "an altered poison bottle". This challenge really had me stumped, I just don't really do altering and I pondered and pondered and pondered until I ran out of time. I looked at bottles, but just drew a complete blank. In the end I decided to make a tag for a beer bottle, as that's my husband's favourite "poison". I also decided to go masculine, and also attempted "witty".


I used the quote "escape the ordinary...daydream" but changed it to "escape the ordinary...drink".
I thought that this little guy had an air of inebriation about him.


So all in all, I feel that I cheated on this challenge, but I think I might just get away with it.


And for those who remember and loved him, the little bowtie is an homage to Keith Floyd.

All stamps are from Stampotique

Sunday, October 23, 2011

Christmas with non-Christmas stamps


You don't always have to buy special Christmas stamps to make your Christmas cards. Sometimes you just have to look at the stamps you have in a different way. This general tree from Stampotique, can easily be made to look wintry with simple colouring, and the addition of white flower soft or glitter. The tiny bird from Jo Capper-Sandon's range can easily be made to look like a robin redbreast with the appropriate colouring


all stamps are from , I made this for the Happy Daze challenge (where you can purchase your stampotique stamps)

Friday, October 21, 2011

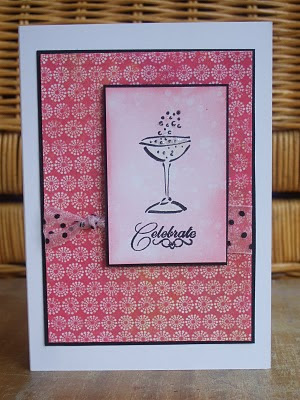
cocktails and stripes


I've combined the stripe challenge at one layer wednesday with the cocktail challenge at less is more to make this really simple card.


To make the stripes, I randomly snipped a piece of copy paper with scissors, then cut them at irregular heights and angles. I sprayed the back with stick and spray, and then brayer the ink over the top.
I had previously stamped and mask the glass stamp from The Frantic Stamper's own range of stamps.


I stamped the word celebrate, lightly coloured the glass with pink pencil and applied glossy accents.

Wednesday, October 19, 2011

SDC 40: Tag time


At The Stampotique Challenge Nellie has challenged us to make a tag. You can use any stamps for this challenge, but as usual Stampotique stamps are up for grabs as a prize.


I used an old favourite from Stampotique, Smile, but gave him a crown from Jo Capper-Sandon's range, which I stamped using a masking technique. The words are a stamp from Jo's latest collection and work perfectly with the crown.

I highlighted the crown and the edge of the tag, using a quickie glue pen and gilding flakes. I love this simple technique.

Monday, October 17, 2011

love your style


This card is made with an image and words from the new soon to be released Rogue Redhead plate "milliner misses" This is an easy peasy quick collage card. The main image is coloured with pencils, the edges distressed and inked with tea dye distress ink. and that's about as complicated as it gets.

Thursday, October 13, 2011

gingersnap creations: alcohol inks


The new challenge at gingersnaps is to use alcohol inks. to be honest I don't use mine very often, but I don't know why.

To make this card I stamped Carol's flower from Stampotique onto acetate with stazon, then on the reverse I applied various colours of ranger alcohol inks with a blending tool. I then glued this to the card, to which I had already added a ribbon (by threading through the card), glued on a button.

Sunday, October 09, 2011

A "Stella" Hallowe'en

In previous posts I have used Stella Sitting on various props, and have used masking to achieve this. I know that a lot of people find masking a bit too "faffy", so for this card I used the simpler "cutting out" method!!
I just stamped Stella, the broom and hat, onto white card coloured with pencils and cut them out.
I made the moon background by cutting out a circle mask (by drawing around the inside of a roll of sellotape), then applied black soot and pumice stone distress inks with a cotton wool ball. I
removed the maks, applied a litle more pumice stone ink, for clouds. I stamped happy (from Happy unbirthday) and old english Hallowe'en. I glued Stella and her accessories in place.
All of the Stamps are from Jo Capper-Sandon's range from Stampotique Originals.

Thursday, October 06, 2011

knitted hat with crochet mistletoe


or a christmas "kiss me quick" hat.

I found a pattern for crochet mistletoe in a book and made a few (although I changed the pattern slightly from the book) I decided that it would be cool to put it on a hat, so I knitted a simple hat in white sparkly yarn and sewed on the mistletoe. I added a couple of faux pearls from a cheap bracelet for the berries.

Tuesday, October 04, 2011

mistletoe bird house


The new monthly challenge at Happy Daze is Christmas or Hallowe'en.

The design team were given these tiny little wooden bird houses to play with. Unsurprisingly I kept mine simple. The only stamp I used is Jo's Mistletoe stamp from Stampotique.

Check out the instructions and what the rest of the design team did on the Happy Daze blog.

Friday, September 30, 2011

Envelope Fold T-shirt Cushion - the tutorial


I promised the tutorial for this cushion a little while ago.

I used to make my t-shirt cushions using this tutorial, where the cushion is fully sealed and the t-shirt is left intact. this is fine for me as to wash I unpick the final seam, wash, then sew it back up.
But I wanted to make a cushion for a friend that doesn't really sew, and she was happy for me to cut the t-shirt, so i decided to make an envelope fold cushion.
Work with the T-shirt inside out.
The first thing is to decide on the size, the maximum square you can make is the width between the arm holes, measure this, and then measure the same distance down from the neck hole and mark this square on the reverse of the front of the t-shirt.
turn the th-shirt over so you are working from the back (still inside out)cut up the sides nearly to the arm hole. You will actually cut it all the way up, but just cutting this far, helps to hold the positions of the front and back.
Fold the front of the t-shirt inside the t-shirt to make the square you decided on previously.( this will make the envelope flap, so the longer it is, the better.)
fold up the back, to shorten it ( I made it shorter than the front, but have since decided that it is better to actually make it the same length)

sew across this hem.

pin front and back together, trim off surplus on sides and top and sew along the sides and top of the square. Make sure that you are also sewing in the flap that you folded earlier

turn right side out.

insert cushion pad (tip: use a cushion pad larger than the measured size of your cover for a plump cushion)

Wednesday, September 28, 2011

stampotique challenge #39 something funny


It's Stampotique design team member Vicki's birthday today, so a big happy birthday Vicki!!
As her birthday fell on a challenge day and she obviously has a great sense of humour (as well as oodles of talent), she set us the challenge of making a humourous birthday card. This is a stampotique stamps only challenge, but luckily the quirky images from stampotique are perfect for adding a funny quote as you can see here.

I really wanted to use this new dog image, isn't it adorable, and I took the hat from this stamp.
The background is done using this technique.Link

Sunday, September 25, 2011

splashy dragonfly card


This as a really simple card I made with Jo's new Dragonfly stamp (again) and verse from stampotique. I created the simple background by doing a very small spray of adirondack sprays in 3 colours. I then used the same blue spray with a paintbrush to colour the dragonfly.
I have shown this on the happy daze blog.
Stamps are available from stampotique and happy daze in the uk. The sprays are available from Happy Daze.

I am also entering this for one layer wednesday's sentiment-a-mania challenge, where the sentiment must take prominence or at least be equal to the main image.

Friday, September 23, 2011

frantic stamper-sketch sunday


Here's my Card for Frantic Stamper's Sketch Sunday Challenge
All of the materials for this card are available from the frantic stamper and the main image is a stamp from the frantic stampers own range of stamps.

Thursday, September 22, 2011

cushions galore....

I'm in a bit of a cushion making frenzy at the moment. I have a new sewing machine and I adore it, so here's a selection

4 envelope fold cushions made from the leftovers from shortening a pair of curtains

..................


some red corduroy cushions with a zip in the seam (I just learned how to do that from a youtube video)- these are to go on the back seat of my car.

........................


an envelope fold t-shirt cushion (tutorial to follow)

...................


and then finally not sewn, but crocheted, a really simple crochet cushion with a zip in the back.